Water at a summer cottage is required not only for owners to comply with sanitary and hygienic standards. It is necessary for watering plants, caring for the territory and pets, refreshing and bathing in the hot summer season. Agree that all the required volume is difficult to lift from the source manually with buckets.
However, there is a way to alleviate the difficult fate of summer residents - this is a home-made pump for water. Even if there is no money to buy pumping equipment, you can become the proud owner of a useful technical device. Literally one power of thought is sometimes enough to build it.
We have collected and systematized for you valuable information on the manufacture of virtually free homemade products. The models presented for consideration were tested in practice and deservedly received recognition from the owners. A thorough description of the manufacturing technology is supplemented by diagrams, photo and video materials.
Construction # 1 - Overflow Pump
This pump is likely to be the simplest and cheapest, because the starting materials are literally dumped, i.e. don't cost anything at all.
To implement the ideas for its assembly, the following materials are required:
- plastic bottle with cork;
- plastic bottle without cork;
- a piece of plastic pipe of suitable diameter;
- discharge hose.
To begin with, it is necessary to make a flap valve.
We take out the gasket from the lid of the plastic bottle. We cut in a circle so that the gasket in diameter becomes smaller than the neck of the bottle. In this case, you must leave untouched a narrow sector, about 15-20 degrees.

The sector must be left so wide that it can swing easily, but not come off
In the center of the cap from the plastic bottle, we drill a hole of about 8 mm. We insert the gasket and screw the trimmed neck.

The purpose of screwing in the neck is to clamp the membrane and get a flap valve
In the finished valve, insert the plastic pipe. From the second plastic bottle, cut off the top. It should be something like a fence funnel. We fix it over a plastic pipe.
At the other end of the plastic pipe we put on a drain hose. The simplest home-made pump for pumping water is ready.

The conical portion will help the fluid open the petal. In addition, the valve will not hit the bottom
With a sharp movement of the hand up and down, we make the liquid rise through the plastic pipe to the spout. Then the fluid will flow by gravity.
There are other options:
Image Gallery
Photo from
The most common homemade option
Home-made piston pump model
Witty centrifugal type solution
Hand-made vibrating unit
To use a surface or submersible piston pump, a tubular well is required — a well that can also be drilled independently as an Abyssinian well or drilled.
Design # 2 - Hand Pump with Direct Spout
A very simple device for pumping water from a barrel, a mine well. Advantages of this design: speed of assembly, cheap cost.
Necessary Details:
- PVC pipe d.50mm - 1 pc.;
- PVC coupling d.50mm - 1 pc;
- PPR pipe d.24mm - 1 pc.;
- branch PPR d.24 - 1 pc;
- PVC plug d.50mm - 2 pcs.;
- piece of rubber d.50mm, 3-4mm thick - 1pc;
- 15mm check valve - 1 pc.;
- empty silicone bottle 330ml - 1pc;
- coupling screw clamp - 1 pc;
- screw nut or rivet - 1 pc;
- coupling nut d.15 - 1 pc.
The assembly of the entire structure begins with the manufacture of a check valve.
Check valve construction. We prepare the check valve from the plug Ø 50mm.We drill a few holes around the perimeter of the plug Ø 5-6mm. In the center, we drill a hole of suitable diameter for a screw-nut pair or a rivet.
On the inside of the plug we impose a rubber disc Ø 50mm. The disc must not rub against the walls of the plug, but must cover all drilled holes. In the center we tighten with a screw-nut or rivet, the screw will not work. If you encounter difficulties with materials or workmanship, you can replace it with a prefabricated check valve.
What is a factory-made check valve used to operate a pumping station is described in detail in our recommended article.
Preparing the pump sleeve. The length of the sleeve should be commensurate with the depth of the well or container with water. We cut the PVC sewer pipe Ø 50mm of the desired length, from the narrow end. We insert the valve just manufactured into the pipe bell. For reliability, fasten with screws on both sides.
For the second end, we prepare a plug with a pre-drilled hole Ø 25mm. This hole in the plug is made according to the diameter of the pipe PPR Ø 24. Great accuracy is not required, the plug serves as a support for sliding.
Piston assembly procedure. We cut off the nose of an empty silicone bottle. Next, it is necessary to heat the cylinder and insert the sleeve into the PVC so that the diameter of the cylinder exactly matches the diameter of the sleeve. We put a can of silicone on the valve on the back of the arrow (the arrow on the check valve shows the direction of water movement).
We cut off the excess cylinder. We fix with a union nut d.15.
The device of the pump rod. The stem length should be 50-60 cm longer than the sleeve length. One end of the stem must be warmed up and a check valve inserted. The arrow on the check valve should point inside the stem. Until the pipe has finally cooled down, we tighten it with a screw clamp.
Final assembly of the pump. We insert the rod into the sleeve, from above through the coupling we fix the plug (sliding support). To top it off, at the end of the stem pipe we fasten the 24mm PPR bend. It remains to connect the hose and you can pump water.

The pipe material can be any, and the cross section is not necessarily round. It is important to choose a suitable piston for the sleeve.
The branch serves as a support for the hand. For convenience, you can take a tee and drown one side of it.
Construction # 3 - hand pump with side spout
The previous design has one, but a significant drawback. Spout moves with the stem. This design is not much more complicated, but much more convenient.
The sleeve must be improved. Add to the construction a PVC tee d. 50mm with a bend of 35 degrees. The tee must be inserted into the top of the sleeve. In the rod, near the piston, we drill several holes of large diameter, the main thing is not to overdo it and not violate the rigidity of the entire structure.

Moving up the piston pushes fluid into the outlet pipe. Top cover supports piston rod
Now water will begin to pour out into the space between the stem and the sleeve. When the piston moves up, water will flow into the spout.
Design # 4 - Piston Well Pump
This pump design is suitable for wells of no more than 8 meters. The principle of operation is based on the vacuum created by the piston inside the cylinder. Useful home-made can become an excellent alternative to pumping equipment of factory production, will help to solve the problems of water production for servicing a summer cottage.

In such pumps, the top cover is either absent or has a slit-like opening, since the rod is rigidly connected to the handle
Necessary materials:
- metal pipe d.100mm., length 1m .;
- rubber;
- piston;
- two valves.
Pump performance directly depends on the tightness of the entire structure.
You will find a detailed description of the manufacturing process of a piston pump for use at a summer cottage in one of the popular articles on our website.
Step # 1: Unit Sleeve Design
For the manufacture of the pump sleeve, it is necessary to pay attention to the inner surface, it must be even and smooth. A liner from a truck engine might be a good option.
From below, a steel bottom must be welded to the liner along the diameter of the wellhead. In the center of the bottom, either a flap valve or a factory valve is installed.
A cover is made for the top of the sleeve, although this part is more aesthetic, you can do without it. It is necessary to pay attention to the fact that the hole for the piston rod is slit-shaped.
Step # 2: Build the Pump Piston
For the piston, you need to take 2 metal discs. Between them lay not very thick rubber 1cm, a little larger diameter than the wheels. Next, we tighten the discs with bolts.
As a result, the rubber disk will be squeezed and a sandwich of metal and rubber should be obtained. The point is to create a rubber rim around the piston edge that will form the necessary piston-sleeve seal.
It remains to install the valve and weld the ear to the stem.
Step # 3. Rubber flap valve manufacturing
The petal valve consists of a rubber disc of not very large thickness. Disc size must be larger than inlets. A hole is drilled in the center of the rubber. Through this hole and the pressure plate, the rubber disc is mounted on top of the inlets.
When sucking in, the edges of the rubber rise and water begins to flow. During the reverse stroke, pressure is created: rubber reliably blocks the inlet openings.
Step # 4: Final assembly and installation
It is advisable to cut threads on the wellhead and on the bottom of the pump liner. The thread will make it easy to remove the pump for maintenance and make the installation airtight.
Install the top cover and attach the handle to the stem. For comfortable work, the end of the handle can be wrapped with electrical tape or rope, laying a turn to turn.

If the pump does not pump water, it is necessary to eliminate all leaks, including in connection with the head of the well (+)
The restriction on the depth of the well is due to the theoretical impossibility to create a vacuum of more than 1 atmosphere. If the well is deeper, you will have to modify the pump to deep.
Design # 5 - Submersible Piston Pump
The difference from a conventional piston pump is that the pump sleeve must be installed to the depth of the well. In this case, the stem length is more than 10 meters.

The wellbore can serve as the sleeve of such a pump, and the suspended load can serve as a spring (+)
There are two ways to solve this problem:
- Make the stem from a lighter material, such as an aluminum pipe.
- Make a stem from a chain.
An explanation is needed for the second option. In this case, the stem is not hard. The bottom of the sleeve is connected to the piston bottom with a return spring.
Construction # 6 - American or Spiral Type
The spiral pump uses the energy of the river. For work, the minimum requirements must be met: depth - at least 30 cm, flow velocity - at least 1.5 m / s.
Option 1
Necessary materials:
- flexible hose d.50mm;
- several hose clamps;
- fence - PVC pipe d. 150mm;
- wheel;
- pipe reducer.
The main difficulty in such a pump is a pipe gearbox. This can be found in decommissioned sewage machines or get from factory equipment.

For greater efficiency, the impeller is attached to the pump
Flexible hose with clamps attached to the wheel in a spiral. At one end joins a fence made of PVC pipe d. 150mm. The second end of the hose is put on the pipe reducer.
Water is taken in by a water intake and moves in a spiral, creating the necessary pressure in the system. The lifting height depends on the flow velocity and the immersion depth of the intake.
Option 2
Necessary materials:
- flexible hose d.12mm (5);
- barrel plastic d.50cm, length 90cm (7);
- polystyrene (4);
- impeller (3);
- sleeve coupling (2);
At the bottom of the barrel, cut the intake hole.Inside the barrel, lay the hose tightly in a spiral and connect it to the sleeve coupling.

Inside the barrel, the hose is tightly laid, pressed to the walls with a strip. The barrel can be metal with foam floats
To give buoyancy inside the barrel, it is necessary to glue foam floats. Finally, screw the impeller.
For this design option, the drain hose should be 25 mm. in diameter.
Design # 7 - Wave Energy Pump
As the name implies, such pumps use wave energy. Of course, the lakes are not so big waves, but the pump works around the clock and can pump up to 20 cubic meters per day.
Option 1
Necessary materials:
- float;
- corrugated pipe;
- two valves;
- mast mount.
The float is a pipe, a log, is selected depending on the rigidity of the corrugated pipe, empirically.

Corrugated pipe can be made of plastic or metal. The weight of the log needs to be selected experimentally
Two valves operating in the same direction are mounted in a corrugated pipe.
When the float moves down, the corrugated pipe stretches, as a result, water is drawn. When the float moves up, the corrugation contracts and pushes the water up. Therefore, the float should be quite heavy and large.
The entire structure is rigidly attached to the mast.
Option 2
This design differs from the first option in that the corrugated pipe is replaced by a brake chamber. This diaphragm-based design is very often used in do-it-yourself simple water pumps. Such a pump is quite versatile and can receive energy from wind, water, steam, the sun.
The brake chamber should be disassembled and only two valve openings should be left.

Instead of home-made valves, you can use ready-made, plumbing. Washers must be of sufficient diameter so that the diaphragm does not tear (+)
Making suitable valves is a separate task.
Necessary materials:
- copper or brass pipe;
- balls with a slightly larger diameter - 2 pcs.;
- spring;
- copper strip or bar;
- rubber.
For the inlet valve, cut off the tube and drill so that the ball fits tightly on the tube. It is necessary to ensure that the ball does not pass water. In order to prevent the ball from falling out, solder a wire or strip from above.
The design of the exhaust valve differs from the inlet by the presence of a spring. The spring must be installed between the ball and the copper strip.
From the rubber, we cut out the diaphragm to the size of the brake chamber. To drive the diaphragm, you need to drill a hole in the center and stretch the stud. We insert the valve from the bottom of the brake chamber. For sealing, you can use epoxy glue.
Balls for valves are better to find not metal, so they will not be susceptible to corrosion.
Option 3
Based on the design of the two previous options, you can think about building a more advanced model.

It is advisable to choose a dry and non-resinous log, so it will be easier, pay attention to the absence of cracks
For this pump, four stakes (1) must be driven into the bottom of the pond. Then make a log float. It is necessary to make cuts in the log, so that when swinging on the waves it does not rotate.
For durability, it is recommended to process the log with a hot mixture of kerosene and drying oil. You need to do it carefully, handle it in a water bath: there should be no open flame.
The log limiters (3) and (4) are nailed so that the log does not damage the pump rod (5) during maximum movement.
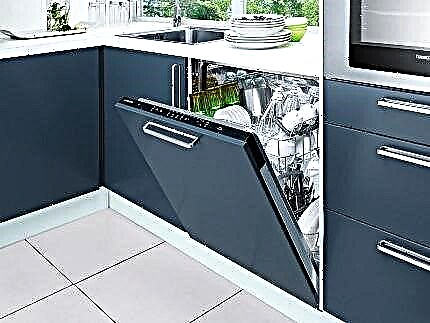
Design # 8 - a device from a washing machine
Often, items or even entire assemblies from old things remain on the farm. A centrifugal pump can be removed from an already unnecessary washing machine. Such a pump is perfect for pumping water from a depth of 2 meters.
Necessary materials:
- centrifugal pump from the washing machine;
- flap valve from the washing machine or homemade;
- plug; bottle cap;
- hose;
- preferably isolation transformer.
If a ready-made valve from the washing machine is used, it must be modified. One hole must be plugged, for example using a bottle cap.

Excess pump openings must be plugged. If the case is metal - grounding is mandatory
We connect the petal valve to the hose and lower it into the pit or well. The second end of the hose is connected to the pump. For the system to start working, it is necessary to fill the hose with valve and the pump itself with water. It remains to connect the transformer, and the pump is ready for operation.
Design # 9 - compressor water pump
If you have already drilled a well, have an air compressor, do not rush to purchase a water pump. It will be successfully replaced by a structurally simple airlift device.
Necessary materials:
- pouring pipe d.20-30mm .;
- air pipe 10-20mm .;
The principle of the pump is very simple. It is necessary to drill a hole in the spout pipe, they need to be positioned closer to the bottom. The hole should be 2-2.5 times larger in diameter of the air pipe. It remains to insert the air pipe and apply air pressure.

One of the most efficient and simple pumps, does not clog and assemble in 5 minutes
The effectiveness of such a pump depends on the height of the water level, the depth of the reservoir, the compressor capacity (capacity). The efficiency is about 70%.
Construction # 10 - Gear Water Machine
The heart of this design is gear pumps for pumping oil from agricultural or truck equipment. Similar characteristics of the power plant of the power steering from KrAZ.
Unit Specifications:
- pump displacement - 32 cm3;
- maximum pressure - 2.1 bar;
- operating speed - 2400 rpm;
- maximum permissible speed - 3600 rpm;
- nominal pumped volume - 72 l / min.
If possible, an engine from a washing machine is connected to such a pump. The engine of household appliances has several advantages: it works from a single-phase 220V network, it has a starting system (capacitor).

Gear mechanisms are left and right, you need to pay attention to the direction of the arrow on the case
Pulleys and a belt may be required to obtain the required speed. The advantage of the gear pump is that the gears are able to create the necessary suction force even without pre-filling with water.
The only remark: after the pump is running to prevent corrosion of steel gears, it is necessary to let the pump run idle for about 20 minutes.
Construction # 11 - Bicycle Wheel Pump
Two-wheel high-performance pump.
Necessary materials:
- sewer pipes and PVC bends;
- bicycle wheel;
- nylon rope;
- small pulley;
- several pistons;
- mounting rod.
The principle of operation of this pump is similar to the operation of a dragline.
First you need to build a sleeve from the sewer pipe, which will be immersed in water. An outlet is put on the upper part of the sleeve through which water will drain. Next, we install a small pulley from below (a wheel rim from a wheelbarrow is suitable), and a bicycle wheel from above.
Along the entire length of the rope we fasten a series of pistons, having previously passed through the sleeve. The rope should cover the pulley and bicycle wheel.

The device is very effective, especially if you use a bicycle drive. Feet will be much easier to twist.
Rotating a bicycle wheel, each piston on a rope captures water and lifts upwards as if on an elevator. A water column flows into a branch.
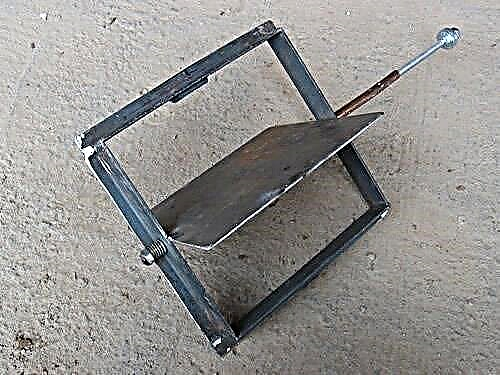
Construction # 12 - “homemade” for a small creek
This pump can cost an extremely small amount of energy. Of course it is good if there is a river or lake. But what if the river is shallow in summer? A pump-type pump will help.

Such a pump allows the use of very small values of the energy of a small stream
The main part of the design is two buckets rigidly interconnected via blocks (4). From the stream it is necessary to drain from galvanized steel (3). In order to reduce wear, a piece of plastic is placed under it. The drainage system is rigidly connected by a leash with a rope (5).

The leash 6 is made of rigid wire and the length is calculated so that the drainage moves to the desired angle
The entire system must be adjusted so that when filling one bucket, the drainage will move to the second bucket. The energy of the buckets is transmitted to the pump (10) by means of a crank (8).
Construction # 13 - Shukhov wick pump
The Russian inventor Shukhov became famous for many structures, including the radio tower in Moscow. Below will be considered another of his invention - a water pump.

Pulleys are made compound. The depth of the groove should be slightly less than the swollen rope
The pump uses a special rope. This rope consists of braided cotton threads with a total thickness of 5-6 mm, enclosed in a sheath. The thread is passed through the pulleys.
When the movement occurs, the rope gets wet and wraps around the pulleys. The pulley (5) with the help of a spring (4) forces the rope against the pulley (3). The squeezed water flows into the tray (7). Figure “c” shows sections of pulleys (3) and (5), respectively.
For the operation of the entire system, an electric motor of only 5-10 watts is needed. Typically, these engines have 1,500 rpm.
To reduce the speed and increase the force, you can use the worm gear shown in figure "c". It is quite possible to make it manually. To do this, you need to find a suitable gear wheel, and make the worm out of wire. Small forces on the shaft allow manufacturing inaccuracies.
With your own hands you can assemble not only a pump that pumps water for domestic needs, but also a device that can be successfully used in the landscape design of the site. Successful options for home-made fountain pumps will be presented in the next article.
Clip # 1. The process of manufacturing a simple unit for pumping water:
Clip # 2. Mini version of a homemade water pump:
Clip # 3. The principle of operation of an elementary pump - airlift:
The presented options for home-made pumps for pumping water are made from improvised means, often even without cost. All the charm is that each design is completely open to further improvements and upgrades. So your pump will surely be a unique product.
Of course, hand pumps will not help to build an autonomous water supply system at the summer cottage, but they will save you from the application of the impressive physical effort required to collect and transport water to the place of use.
Do you have your own interesting solutions for making homemade pumps? Want to share another curious option? Found flaws in the article? Please comment in the block below the text.